
Setting up your Availability Manager
Step 1) Access the Availability Manager (AVM).
You can access the AVM either through your Weekly Reminder Email or the bookmarked page in your Browser. Below is an example of the Weekly Reminder Email:
 Step 2) Confirm and Update Your Business Information.
- Click the “Add Logo” button to upload your company logo (optional).
- Logo should be at least 420px wide.
- Max. size 5MB
- Write your first Update for your buyers. This message will appear on the home dashboard for all of your buyers as soon as they log into Forager!
- Verify your business name, address, and phone number.
- Contact emily@goforager.com if incorrect.
- Fill out the other Business Information Categories (check out this article for more details).

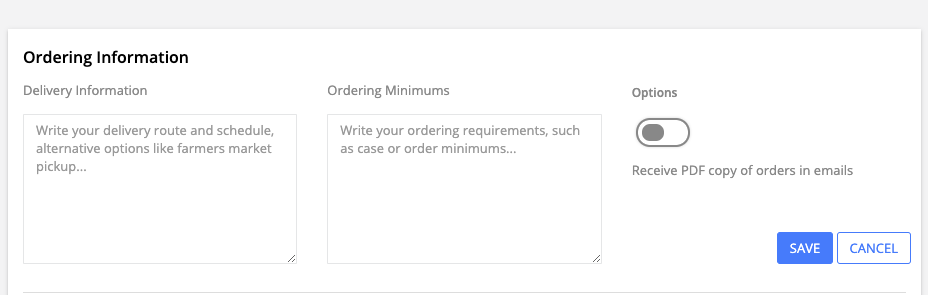
Step 3) Set your Ordering Information
- Write a description of your Delivery Information and your Ordering Minimums. You can also select the option to receive PDF versions of your orders in emails.
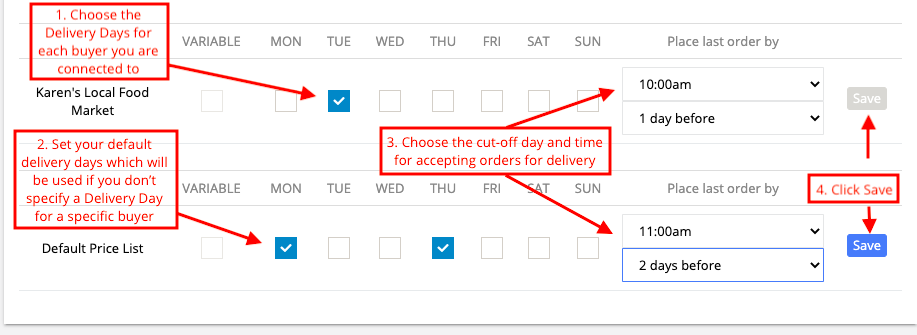
- Choose your delivery days for each buyer to whom you’re connected in Forager.
- If you ship products via mail, UPS, etc., you should mark every day as a delivery day.
- Choose the “Cut-Off Time” for accepting orders before the delivery date.
- Click Save Button to save your Delivery Days.


Variable Delivery Day Option
If you do not deliver on a set schedule, you can select the variable delivery day option. When selecting variable, you do not need to set a "place last order by" cut-off date and time.
** Note ** You can select either variable, or specific days. You cannot select both options. So, if you have delivery days set and you want to change it to variable, you will need to uncheck the delivery days first and then select the variable option.

Step 5) Add Your Products by clicking the "Add Product" button at the top right of your AVM listing.

Step 6) Add Product Details and Availability Status.
- Enter the Product Details (On Left Side of Screen)
- Select Product Category from Drop Down List
- Enter Product Name
- Add Product Description (optional)
- If item is sold by Case, Bag or Flat, check the box next to this option.
- You will be given an additional field to indicate size.
- Select Unit from Drop Down List
- Add Pricing
- If you set a default price, all the buyers will see the same price.
- Pricing specific for one buyer will be displayed only to that buyer.
- If no price is set, item will be marked as unavailable.
- Set Product Availability Status (On Right Side of Screen)
- Options include - Available, Limited & Unavailable.
- Check New Product if it applies to the item.
- New products are highlighted on the buyer dashboard as "new".
- The new status will automatically expire after 7 days.
- Click “Save” when you’re done to add or save changes to your product.

You’re now back in the Availability Manager Main Page and can Add or Edit more Products as needed.